Joint Replacement Center Patient Guide
Planning for Your Operation
What to Bring
- Identification
- Insurance and Prescription Cards
- All current medications in their original bottles
- Comfortable Clothing
- T-shirts
- Sweatshirt - if you tend to get cold
- Loose fitting shorts, capri pants or pajama bottoms. Must be loose enough to pull up and over your knee/hip dressings enabling staff to have access to your incision site
- Pajamas or a robe for the evening (optional)
- Supportive shoes with non-skid sole - No tight shoes as there is sometimes swelling after surgery
- Special Equipment
- Prosthesis, shoe inserts, or regular assistive devices that you currently use
- CPAPs, Eyewear, Hearing aids, Dentures. Don’t forget the cases.
- Rolling walker (standard, two-wheeled) If you do not already have, one will be provided for you after surgery.
Do NOT
- Do not bring jewelry, valuables, money
- Do not wear make-up
- Do not eat solid food after midnight but you will be instructed to drink clear liquids prior to your arrival.
Exercises
- The stronger you are before surgery, the easier your rehab will be.
- Familiarize yourself with post-op strength/range of motion exercises. You may start these before surgery to build up strength.
Preparing for your return home
A little planning before you leave for the hospital will help you when you get back home.
- Plan easy meals in advance
- Prepare a room downstairs if you live in a two-story house to reduce the amount of stair climbing
- Clear your house of obstacles. Remove throw rugs for safe walking
- Install night lights
- Have a firm chair with armrests and good height available. Higher than 18 inches is recommended, for people of average height.
- Arrange for help from a friend or family member to assist with basic convalescent needs and errands
- Plan a place for pets to keep them out of the way for your safe walking
- Consider your home environment and identify potential obstacles to prepare for a safe return home
- Entry steps
- Shower ledges
- Narrow doorways
- Loose handrails
- Thick carpet
- Marble flooring
- Gravel entries
Having Orthopaedic Surgery
We want your experience to be as stress-free as possible. When you know what to expect, you are less likely to feel anxious. We will individualize your care and according to your needs. By the time you leave the hospital, you will know how to care for yourself at home. You and your home care giver’s participation during your hospital stay is a key part of this process. Please be sure to answer provider’s questions thoroughly, ask questions at any time, and tell someone if you are feeling anxious so we may help to ease your concerns early.
Pre-Operative Testing
- Not to be completed more than 30 days before surgery
- Common pre-operative tests
- Blood
- Urine
- Electrocardiogram (ECG)
- X-rays
- Your doctor may require a surgical clearance from your primary care physician to ensure you are healthy enough for surgery
- Additionally, our pre-admission testing (PAT) department will interview you, in depth, to confirm your health history for extra safety and to begin the process of individualizing your care.
Surgery Day
- You will be instructed to show error tub-bathe before surgery. You may use a germ killing soap, such as Hibiclens if recommended by your physician.
- Do not use any lotion or powder
- Please do not wear make-up or nail polish to surgery
Registration
- Enter hospital at Tower I. Walk to the rear of the building to Suite 100 to check in.
- All personal and health information is strictly confidential
- Hospital protocol requires each patient to sign a consent form for anesthesia and surgery. This form will confirm the type and location of the planned surgery, so read it carefully.
- Have questions about your surgery and anesthesia answered before signing.
Pre-Op Activities
- You will be given a gown to be worn during surgery.
- No other clothing is allowed.
- All personal items must be removed
- Hair accessories
- Jewelry
- Glasses
- Contact lenses
- Hearing aids
- Removable prostheses
- Artificial dental work (unless otherwise instructed)
- Let family or friends hold your valuables
About an hour before surgery
- IV will be started and used to administer:
- Anesthesia
- Fluids
- Medication
- Medication may be given to help you relax, if necessary
- You will be asked to empty your bladder before receiving this medication
- Medication may cause:
- Drowsiness
- Light-headedness
- Dry mouth
- Eyesight may seem blurry
- Side rails on your bed will be raised for your safety
- Do not get out of bed without asking for help
The Operating Room
You will be closely monitored throughout your surgery. This monitoring includes:
- Vital signs
- Proper positioning
- Infection prevention
Before you wake up from surgery, you may get the following equipment placed:
- Bladder catheter
- Drainage tube
Your family will be able to monitor your progress via a confidential patient tracking boarding the waiting room.
The Recovery Room
After your surgery, you will be moved to the recovery room. You may hear monitors and other machines sounding or the hum of conversations.
What to expect during this time
- Close monitoring of vital signs
- Encouraged to cough and take deep breaths
- Eyesight may be blurry because of the ointment applied to keep them moist during surgery
- Oxygen via a mask, or nasal cannula, if needed
- Throat may feel sore from the breathing tube placed during surgery
- Discomfort or pain at incision site
- Pain medication, if needed
Once in Your Room
After your recovery period, you will be moved to your room, on the Post Surgical Unit (PSU).
What to expect during this time:
- Frequent checks to make sure you are comfortable and have what you need
- Frequent checks of vital signs and bandages throughout the day and night
- Physical Therapy evaluation on the day of surgery, in most cases.
- Slow introduction of food and drink as your digestive system recovers from anesthesia
Deep Breathing and Coughing
After surgery, deep breathing is crucial. Common issues after surgery are:
- Breathing muscles may be relaxed after anesthesia
- Your lungs may be congested
- You may run a slight fever
All respond favorably to deep breathing exercises and coughing. You will also be instructed on how to use a breathing exerciser called an Incentive Spirometer.
Hand and Foot Exercises
Movements with your hands and feet help improve your circulation.
- Make big circles with your feet
- Point your toes, then flex your ankles
- Clench your fists, the straighten your fingers
Other tubes and equipment commonly used are:
- Nasal cannula for oxygen delivery
- Heart monitor (electrodes)
- Finger sensor to detect blood oxygen level
- Lower extremity compression garments and pumps to prevent blood clots.
Pain/Pain Management
Your pain
- May increase slowly after the surgery due to the use of internal pain control agents that will wear off over approximately 1-2 days.
- Incision area may begin to burn and you may feel sore and stiff muscles for several weeks during the healing period.
- If you have had a local nerve block, you may at first feel some tingling in your operative limb as sensation returns and the nerve block wears off.
The nurse will frequently ask you what your pain level is, 0 being no pain and 10 being worst possible. Don’t hesitate to ask for pain medicine. Asking for medication early is better than letting the pain become more severe. If it is too soon for more, the nurse may try other alternatives until it is safe to give more medication:
- Change your position
- Turn your pillow
- Apply ice packs
- Teach relaxation techniques
Pain medication may not completely stop the pain, but it will take the edge off. Our goal is to keep your pain at a manageable and a tolerable level. When pain is manageable you will be able to do the simple exercises you have been taught more easily - which can also assist with pain management.
Diet
We may help you make food choices that work well with your medications. For example, some blood thinners, for the prevention of blood clots, do not work well with a diet containing green leafy foods. If this affects you, the dietary department will provide you with a special menu to or dermal from and you will be given education on how to correctly modify your diet at home. Your appetite may be irregular, but eat as healthfully as you can. Good nutrition is an important part of the healing process. If you have any special dietary concerns, do not hesitate to let us know. Your appetite may be irregular, but eat as healthfully as you can. Good nutrition is an important part of the healing process. If you have any special dietary concerns, do not hesitate to let us know.
Getting Up and Around/ Physical Therapy
- Early mobility is necessary for healing and recovery
- Walking with your Therapist will begin as early as the day of surgery, provided you are medically ready to participate.
- Two therapy-treatment sessions each day. Your home caregiver, family or friend should attend the last session on day of discharge, for safety education.
- Please do not attempt to sit up, stand or walk without help or supervision from Therapy or Nursing staff
- Our Fall Prevention Program will support a successful outcome for your surgery
- Your compliance is an important part of that program
Going home/ Discharge goals*
Once you are deemed medically stable by your physician, you should also be able to:
- Perform prescribed home exercises with minimal or no physical assistance
- Show that you understand any post-op precautions for:
- Activity
- Positioning
- Weight-bearing limitations
- Range of motion goals
- Get in and out of bed without assistance
- Move from the bed to a chair, and walk to the bathroom with an assistive device
- Walk 150 feet with an assistive device without physical assistance
- Climb and descend curbs/stairs, if needed
*Goals will be individualized as needed
Before you leave the hospital, be sure you have received enough information about:
- Medications
- Diet
- Activity and exercise
- Going back to work
- Driving
- Rest
- Follow-up visits with the doctor
Options for Care After Leaving the Hospital
After surgery,
All patients will participate in rehabilitation therapy to strengthen and increase mobility in their new joint.
- Length and level of rehabilitation may vary
- Most patients will return home immediately following their 1-2 night hospitalization and continue therapy with Home Health Care.
- Some qualify for immediate Outpatient Therapy.
- Some may need continued inpatient care for medical or rehabilitation issues until they are safe and independent at home.
Your physician, in consultation with you and the health care team members, will decide which level of care is best for you.
Our case manager will coordinate with you and your care team to help make arrangements for continued rehabilitation therapy before you leave the hospital. Any selection will take into consideration your preferences, insurance benefits and your physician recommendation.
Equipment you may need
- Walker (2-wheeled)*
- 3-in-1 (Bedside Commode/Elevated Commode Chair/Shower Seat)*
- Shower Chair/Tub Bench
- Raised toilet seat
- Reaching and Dressing Equipment (optional)
*Items commonly covered by Insurance
Caring for Yourself at Home
Control your discomfort
- Take your pain medication at least 30 minutes before your therapy sessions.
- Change your position frequently throughout the day.
- Use ice to help pain control. Applying ice to your affected joint will decrease discomfort, but maintain a barrier between your skin and the ice pack or cooling pad. Inspect your skin initially to be sure it is not staying too red from the cold. You should use ice after your exercise program.
What to Watch For After Joint Replacement
Body changes you may notice:
- Decreased appetite. Drink plenty of fluids to keep from getting dehydrated. Your desire for solid food will return.
- Difficulty sleeping initially
- Decreased energy for the first month
- Constipation. Pain medications contain narcotics which promote constipation. Use stool softeners/laxatives if absolutely necessary such as:
- Milk of magnesia
- Colace (stool softener)
- Metamucil
- Swelling in or around the incision. Some swelling in the lower leg, ankle, or foot can also be normal.
- Continue to wear your elastic compression stockings for at least 2-3 weeks
- Perform ankle exercises frequently, and
- Elevate the operated leg (foot above the knee, knee above the hip).
Infection Control
An unwelcome complication in any surgery is infection. Although your total joint replacement is at low risk for infection, it is important to realize that the risk remains.
Notify your primary care doctor if you:
- Sustain an injury such as a deep cut or puncture wound
- Develop fever greater than 101.5 F
- Experience signs/symptoms of infection:
- Increased swelling, redness at incision site
- Change in color, amount or odor of drainage
- Increased pain at surgical site.
Prevention of infection
- Take proper care of your incision as directed.
- Wash your hands thoroughly before you handle the surgical site.
- Avoid activities that may contaminate bandage (petcare, gardening, swimming, etc)
- Shower
- Use incision covering as instructed.
- Use a new, clean washcloth or sponge.
- Do Not submerge incision until instructed.
- Change to clean bed linen after each shower. Wear clean clothes/pajamas each day until incision is healed.
- Discourage children or pets in bed with you.
- Notify all physicians and your dentist that you have had a total joint replacement. Prophylactic antibiotics are required for a minimum of two years when having dental work
Blood clots in the legs
Surgery may cause the blood to slow and coagulate in the veins of your legs, creating a blood clot or what we call a“deep vein thrombosis” (DVT). This is why you take blood thinners after surgery, to prevent DVTs. If a clot occurs despite these measures, you may need to be admitted to the hospital to receive intravenous blood thinners. Prompt treatment usually prevents the more serious complication of a pulmonary embolus.
In general, extended travel by car or airplane within the first six weeks of surgery is considered more risky in the development of a blood clot. If you must travel:
- Stop and change position hourly
- Drink plenty of water
- Perform frequent ankle pumps
- Plan frequent bathroom breaks
- Get up and walk
Pressurized airplanes, cramped seats and immobility are a set up for a DVT. Also, you may want to continue wearing the compression stockings, or T.E.D. hose that you will be issued while in the hospital for a few weeks after discharge.
Signs of blood clots in legs
Blood clots can form in either leg. Blood clots are hard to diagnose by physical exam.
Some signs are:
- Swelling in thigh, calf or ankle that does not go down with elevation
- Pain, tenderness in calf
When suspected, an ultrasound test is performed.
Prevention of Blood Clots
- Foot and ankle pumps
- TED Compression Hose
- Walking
- Anti-clotting medicine as prescribed by your doctor
- Coumadin
- Lovenox
- Xarelto
- Aspirin
Pulmonary Embolus
A pulmonary embolus is a serious, but rare complication. It occurs when a blood clot in a leg vein grows big enough where a piece breaks off, floats in the vein and travels to the heart and lungs.
This is an emergency and you should CALL 911 if any of the following symptoms are noticed or suspected:
Signs of a Pulmonary Embolus
- Sudden chest pain
- Difficult and/or rapid breathing
- Shortness of breath
- Sweating
- Confusion
Prevention of Pulmonary Embolus
The best way to avoid a pulmonary embolus is prevention. (See section on Prevention of Blood Clots). If you have symptoms of a blood clot in either leg, call your physician immediately.
Everyday Living
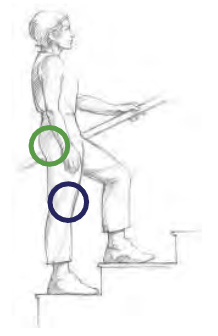
Climbing Stairs: “Up with the Good” Using the handrail for support, start by placing the non-surgical leg on the first step.
- Bring the surgical leg up to the same stair.
- Repeat until you reach the top.
Going down stairs: "Down with the Bad"
- Using the handrail for support, place the surgical leg on the first step.
- Bring the non-surgical leg down on the same stair.
- Repeat until you reach the bottom.
DO NOT climb or descend the stairs in a normal foot over foot fashion until your surgeon or therapist tells you that it is safe to do so.
DO NOT use the walker on the stairs. (Your therapist will teach you a safe technique before you leave the hospital.)
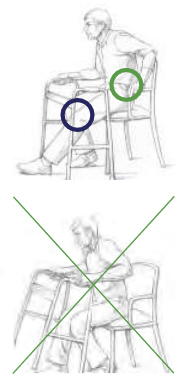
Sitting Down:
- Slowly back up to the seat until you feel it against the back of your legs.
- DO NOT pivot. Slide your surgical leg forward, if needed. (Hip Surgery)
- Reach back for the seat with one hand while holding the walker with the other hand. If the seat is low, place one hand in the center of the walker while reaching back with the other
- Slowly lower your body into sitting.
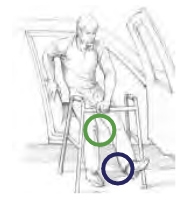
Standing Up:
- Scoot forward to the front edge of the seat
- Place one hand on the seat and the other hand on the walker, then lift yourself off the chair. Be careful not to twist your body.
- Balance yourself with both hands on the walker before attempting to walk.
DO NOT try to use the walker with both hands while standing up.
Avoid seats that are too high, too low or too cushioned, if possible.
For the next several weeks, it is easier to use a chair that has arms.
The above process works for Bed, Chair, Toilet, Bath seat and Car transfers. Your therapist will teach safe techniques for your individual needs before you leave the hospital.
Car Transfer Tips
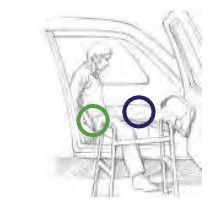
- Move the front passenger seat all the way back to allow the most legroom
- Recline the back of the seat if possible while getting in/out of the car
- Use a firm pillow to raise the seat level, if needed
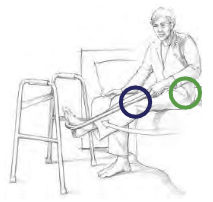
- Turn towards front of car, leaning back as you lift your surgical leg into the car
Bed Transfer Tips
- After sitting, rotate so that you are facing the foot of the bed.
- Lift your leg and pivot into the bed. You may use a leg lifter (cane, a rolled bed sheet, or belt) to help with lifting or lowering your leg.
- Lift your other leg into the bed.
- If your bed is high, your therapist will teach you in the safe use of a step stool, as needed
Lying in Bed
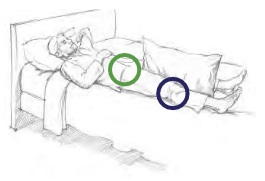
- Position a pillow between your legs when lying on your back (Hip surgery).
- DO NOT position a pillow under your operative knee (Knee surgery).
- Keep the surgical leg positioned in bed so the knee cap and toes are pointed to the ceiling.
- Avoid letting your foot roll inward or outward.
Getting Dressed
All lower extremity dressing should be accomplished in the sitting position. Use dressing equipment as illustrated below, if you do not have someone to assist you. You should practice some of these tasks before surgery if possible. You will need to take care to maintain your Hip Replacement Precautions if you have had Hip Surgery.
Putting on Pants:
- Surgery Leg “In First”
- Pull your pants up over your knees, within easy reach.
- Stand with the walker in front of you to pull your pants up the rest of the way.
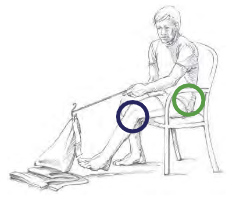
Taking off Pants:
- Surgery Leg “OutLast”
- Back up to the chair or bed where you will be undressing. Lower your pants before sitting.
- In sitting, with the help of the reacher, take your non-surgical knee/foot out first and then the other. Using the reacher can help you remove your pants from your foot and off the floor to prevent a possible trip and fall.
Use a Sock Aid to put on Socks

Use a Long-Handled Shoe Horn to put on Shoes
Frequently Asked Questions
How long will I be in the Hospital?
The goal is 1-3 days after the day of surgery for most patients.
Can a family member stay with me in the hospital?
Yes. We encourage your family member or friend to stay with you while you are here. All rooms are equipped with a convertible chair for their sleeping comfort. This person will also assist you with your therapy sessions.
How long will my new knee last?
We expect most knees to last more than 15 to 20 years. However, there is no guarantee and 10 to 15 percent may not last that long. A second replacement can be donef if necessary.
How long does the surgery take?
Approximately 2-3hours, including preparation and recovery time in the operating room
What are the major risks?
Most surgeries go well, without any complications. Infection and blood clots are two serious complications that concern us the most. To avoid these complications, we use antibiotics and blood thinners. We also take special precautions in the operating room and with your care after the surgery to reduce risk of infections. The chances of this happening in your lifetime are one percent or less.
Will I need blood?
You are unlikely to need a blood transfusion unless you are very anemic before surgery.
When will I start rehab?
The day of surgery. You may sit or stand at the bedside the first day or will begin walking.
When can I drive?
It is recommended you wait until you no longer need prescription pain medication and can walk with a cane or less–typically 4weeks. However this will vary depending on whether its your right hip or knee. Your MD will let you know when you can drive.
Will I need help at home?
Yes. The first several days or weeks, depending on your progress, you may need someone to assist you with housework, meal preparation, transportation, etc. Family or friends may need to be available to help if possible. Preparing ahead of time, before your surgery, can minimize the amount of help needed. Having the laundry done, house cleaned, yard work completed, clean linens put on the bed, and single portion frozen meals will reduce the need for extra help.
When can I shower?
Usually 48 hours after surgery with the incision completely covered by a waterproof dressing. You must not tub-bathe until the skin is completely healed. Check with your MD before taking a tub- bath to see if you are allowed to do so. We recommend using a shower chair in tub or shower initially instead of standing in a shower, due to generalized fatigue after surgery.
When can I resume sexual activity?
The time to resume sexual activity should be discussed with your orthopedic surgeon.
What physical/recreational activities may I participate in after my recovery?
You are encouraged to participate in low impact activities such as walking, dancing, golf, hiking, swimming and bowling. However check with your MD before starting any of these activities.
What items will be sent home with me to use after discharge?
This depends on what has been ordered by your surgeon. It may include any of the following: ice wraps, special ice machines, a walker, an elevated commode chair, sample of dressing supplies. Please check with your nurse or therapist about what your surgeon has ordered for you.
Will I notice anything different about my knee?
Yes, you may have a small area of numbness to the outside of the scar, which may last a year or more and is not serious. Do not kneel until approved by MD. Some patients notice some clicking when they move their knee. This is the result of the artificial surfaces coming together and is not serious. Check with your MD if you have any questions.
Will I notice anything different with my hip?
Yes, you may sense a difference in the length of your legs for a period of time that should subside as you heal. You also may have numbness around the incision. Again check with your MD if you have any questions.
Joint Replacement Exercises
Exercising after surgery is very important. Exercise brings back your strength and flexibility to walk smoothly and get well faster.
Perform all exercises 2-3 times a day, 10-20 repetitions for each exercise.
- Start slowly, and gradually increase the number of repetitions.
- Do not attempt to get down on the floor after your surgery. Exercises should be performed lying on a bed.
- Exercise your arms as well. You will be relying on your arms to help you walk, get in and out of bed and up and down from chair. Chair push-ups while sitting in a chair will help!
- For Knee Surgery, you have an early window of opportunity to gain flexibility for normal daily activities before scar tissue stiffens the knee.
- For Hip Surgery, you may have limitations to the exercises allowed at first. These limitations will be relaxed after a few weeks of recovery. You will be informed of the necessary precautions and modifications when you begin your exercises in the hospital.
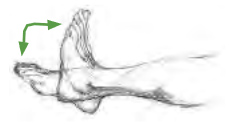
Ankle Pumps
Important for circulation, prevention of blood clots and lower leg flexibility
Position: Sitting or lying down with legs straight.
Exercise: Point toes down then up
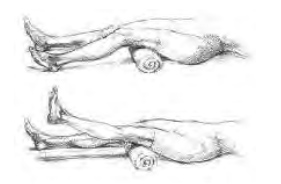
Short Arc Quads
Important for return of muscle strength and early flexibility
Position: Lie on back or supported on elbows. Place a rolled towel under operative knee.
Exercise: Raise lower leg of operative leg until your knee is completely straight. Be sure to keep underside of knee on towel. Lower heel back to the bed.
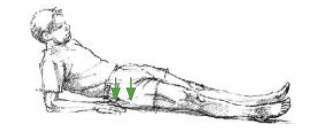
Quadriceps Sets:
Important for circulation, prevention of blood clots and return of muscle strength
Position: Lie on back, or partially reclined with legs straight.
Exercise: Tighten thigh muscle of Both legs by pushing the back of your knee down onto the bed. Hold 5 seconds. Relax

Gluteal Sets:
Important for circulation, prevention of blood clots and return of muscle strength.
Position: Lie on back with legs straight and slightly apart.
Exercise: Squeeze your buttocks together. Hold 5 seconds. Relax.
Heel Slides
Important for flexibility
Position: Lie flat on back with legs straight.
Exercise: Slide foot of operative leg toward buttock, until you feel a stretch in your knee. Try to bend your knee farther with each repetition.
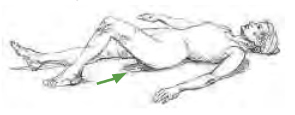
Hip Abduction*
Important for return of muscle strength and flexibility
Position: Lie flat on back with legs straight and slightly apart.
Exercise: Tighten thigh muscle of operative leg. Keep knees and toes pointed up toward ceiling. Slide leg outward, away from non-operative leg until you feel the end of available motion (not stretch).
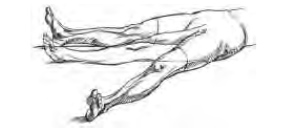
*After Hip Surgery this exercise may be modified depending on your surgeons orders
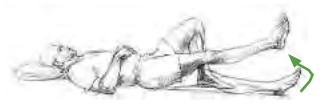
Straight Leg Raises (Knee Surgery)
Important for return of muscle strength
Position: Lie flat on back with operative leg straight. Bend non-operative leg so you can place foot flat on the bed.
Exercise: Tighten muscles on front of thigh of operative leg and flex foot toward you. Then lift operative leg 6 inches from the bed, keeping knee locked. Lower leg slowly to the starting position.
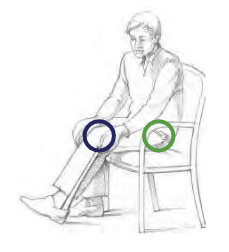
Flexion Stretch (Knee Surgery)
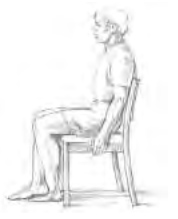
Important for knee-bending flexibility
Position: Sitting all the way back in a chair.
Exercise: Slide foot of operative leg under chair as far as possible. Plant your foot on the floor. Then slide your hips forward in the chair, until you feel a stretch in your knee. Hold for 10 seconds. Slide hips back in chair.
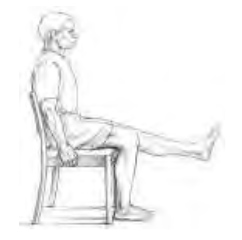
Extension Stretch (Knee Surgery)
Important for knee-straightening flexibility
Position: Sitting in a chair. Place foot of operative leg on an ottoman or raised support.
Exercise: Press downward against thigh just above the knee, and tighten thigh muscle of operative leg, until you feel a stretch in the back of your knee. Hold 10 seconds. Relax.
Hip Replacement Precautions
Depending on your procedure, Your physician and therapist may go over some hip precautions with you after surgery.
Click here to download the PDF version.